

I still remember the excitement that filled the air when my friend graduated last summer. The celebration was a beautiful blend of joy, nostalgia, and anticipation for the future. As we gathered to honor her achievements, the centerpiece of the celebration stole the show: a stunning Graduation Charcuterie Board. It was colorful, elegant, and bursting with delicious flavors. The assortment of cheeses, cured meats, and fresh fruits not only pleased the palate but also served as a conversation starter among guests, making the gathering feel even more special. If you’re looking to impress at your next graduation party or gathering, creating a charcuterie board is both a delightful and rewarding task.
What is Graduation Charcuterie Board
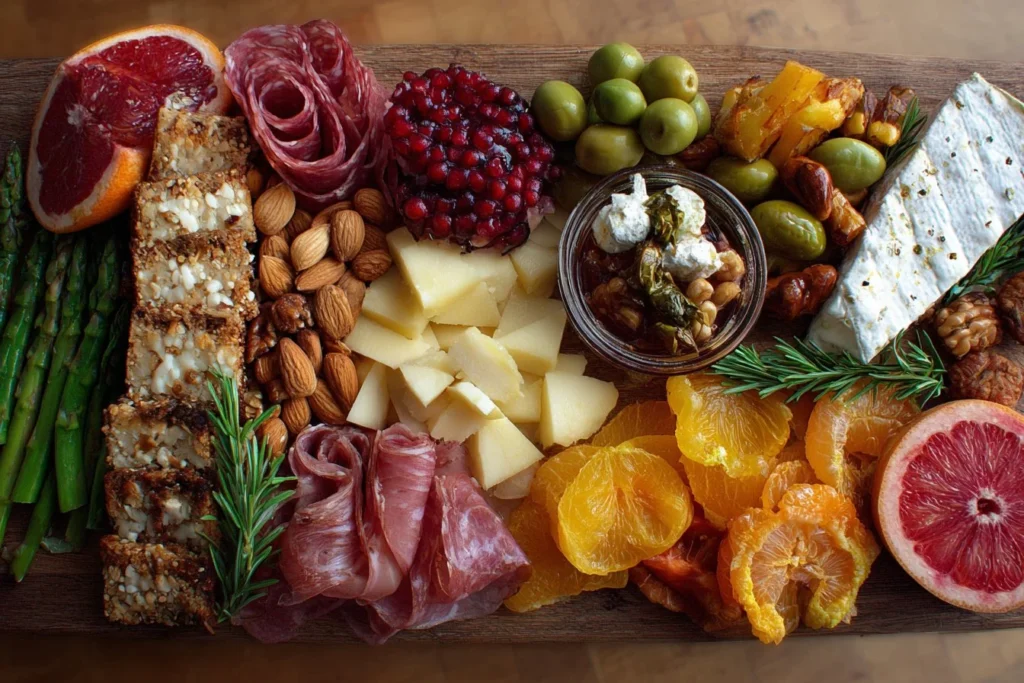
A Graduation Charcuterie Board is a thoughtfully arranged platter featuring a variety of meats, cheeses, fruits, nuts, and accompaniments, perfect for celebrating special occasions like graduations. The art of creating a charcuterie board lies in its versatility and personalization—it allows you to incorporate your favorite flavors while showcasing a vibrant display of colors and textures. As guests enjoy selecting their favorite bites, the charcuterie board not only serves as a delicious meal option but also encourages mingling and sharing, making it an excellent choice for gatherings.
The charcuterie board can be tailored to reflect the graduate’s preferences, reflecting their personal taste, and even their journey through education. Whether they favor gourmet cheeses, artisanal meats, or health-conscious options, the board can cater to all. This makes it not just a food item but an expression of appreciation for the graduate’s efforts.
Why You’ll Love This Graduation Charcuterie Board:
When it comes to hosting a graduation celebration, a charcuterie board stands out for several reasons:
- Quick and simple to prepare: You can assemble it in a short amount of time, leaving you with more moments to celebrate with family and friends.
- Family-friendly meal: It offers something for everyone, accommodating various tastes, preferences, and dietary restrictions.
- Great for beginners: Even those new to entertaining can create beautiful boards with minimal effort.
- Flexible and customizable: You can mix and match ingredients based on what’s seasonal or available, ensuring it feels personal and unique.
- Visually appealing: A well-arranged charcuterie board is a feast for the eyes, serving as an impressive centerpiece that draws guests in.
Making a Graduation Charcuterie Board will not only enhance your gathering but also elevate the celebratory experience, showcasing your thoughtfulness and creativity as a host.
Ingredients
Creating an impressive Graduation Charcuterie Board requires a selection of fresh, delicious ingredients that work well together. Here’s a list of what you’ll need:
- Assorted cheeses (e.g., brie, cheddar, gouda)
- Cured meats (e.g., prosciutto, salami, pepperoni)
- Fresh fruits (e.g., grapes, strawberries, apple slices)
- Nuts (e.g., almonds, walnuts)
- Olives
- Crackers and bread
- Dips (e.g., hummus, mustard)
- Fresh herbs for garnish
With these ingredients, your charcuterie board will be a true celebration of flavors and textures, creating a delightful experience for your guests.
Step-by-Step Instructions for Graduation Charcuterie Board
- Begin by arranging the cheeses on a large platter or board, starting with the largest pieces to create a focal point.
- Fold or roll the cured meats and place them around the cheeses, ensuring some overlap for a more inviting look.
- Add the fresh fruits in clusters to create a vibrant splash of color. Fill in any gaps with nuts and olives, creating appealing sections.
- Place a variety of crackers and slices of bread in a separate section or along the edges of the board to offer guests various pairing options.
- Include small bowls with dips throughout the board, allowing for easy access and a tidy presentation.
- Finish off the arrangement by garnishing with fresh herbs, creating a beautiful contrast to the other ingredients.
- Serve the charcuterie board with pride and enjoy the compliments from your guests.
Assembling this board is not just an artistic endeavor; it’s about creating a memorable experience that encapsulates celebration.
Pro Tips and Variations:
Creating your Graduation Charcuterie Board can be fun and straightforward with a few helpful tips:
- Choose Seasonal Ingredients: Incorporate fresh fruits and vegetables that are in season. This ensures optimal flavor and freshness.
- Consider Dietary Restrictions: Have gluten-free crackers or vegan cheeses on hand to accommodate various dietary needs.
- Use a Variety of Textures: Combine creamy cheeses, crunchy nuts, and soft fruits for a delightful eating experience.
- Add Sweetness: Consider including honey or dark chocolate for a sweet contrast to the savory elements.
- Themed Colors: Use the graduate’s school colors as inspiration for your ingredient choices, from fruits to plates and decorations.
- Utilize Different Boards: Experiment with different types of boards or platters. Large wooden boards, slate tiles, or even tiered cake stands can make for creative displays.
With these tips, you can personalize your board further, making it unique to your celebration and the guest of honor.
How to Serve Graduation Charcuterie Board
Presenting your Graduation Charcuterie Board can elevate your hosting game. Consider these serving suggestions:
- Pair with a refreshing salad or light pasta to round out the meal, offering guests a more substantial option alongside the board.
- Provide plenty of napkins and small plates for guests to easily serve themselves and keep the area tidy.
- Consider offering toothpicks for easy sampling of smaller items, ensuring everyone can enjoy the selection without fuss.
- Display the board on a designated table or area where guests can gather around and mingle, encouraging a social atmosphere.
- If you plan to keep the board out for a while, consider placing ingredients that may spoil quickly in a cooler nearby, offering them on demand to maintain freshness.
These serving ideas make the experience enjoyable and rememberable for all attendees.
How to Store Graduation Charcuterie Board
After the celebration, it’s essential to store any leftover ingredients properly to maintain their freshness. Here’s how to go about it:
- Refrigerate Promptly: As soon as the gathering concludes, promptly store any leftover items in airtight containers. Cheeses, meats, and perishable fruits should be refrigerated to prevent spoilage.
- Separate Components: If possible, keep fruits, cheeses, and meats in separate containers. This will help maintain texture and flavor.
- Use Within Three Days: Consume leftovers within three days for the best quality. Cured meats and cheeses remain safe, while fruits should be eaten sooner.
- Avoid Freezing: Generally, it’s best not to freeze items from your charcuterie board, as freezing can alter the texture of cheeses and cured meats.
By following these storage tips, you can enjoy the delightful flavors from your charcuterie board for a little while longer!
Nutrition Information (Optional but Recommended)
While charcuterie boards are often indulgent, they can offer nutritional benefits as well. Focus on including a variety of ingredients to enhance nutritional value. A serving typically provides:
- Protein: Due to the cured meats and cheeses
- Healthy Fats: From nuts and certain cheeses
- Fiber: From fresh fruits and whole-grain crackers
- Vitamins and Antioxidants: Present in the fruits and herbs
Be mindful of portion sizes, especially with higher calorie items like cured meats and cheeses, to balance enjoyment with health.
FAQs for Graduation Charcuterie Board
1. How can I make my charcuterie board vegetarian?
Opt for a selection of cheeses, nuts, olives, seasonal fruits, and vegetables. You can also include plant-based dips to enhance flavor.
2. What is the best type of cheese for a charcuterie board?
Include a variety of textures and flavors. Brie, cheddar, gouda, and blue cheese are popular choices.
3. Can I prepare the board ahead of time?
Yes, you can assemble the board a few hours before serving. Cover it with plastic wrap and refrigerate until you’re ready to present it.
4. What should I pair with my charcuterie board?
Serve the board with a selection of drinks, like sparkling water or juices, and consider light sides like salads or breadsticks to complement the flavors.
Conclusion
Creating a Graduation Charcuterie Board is the perfect way to celebrate achievements while bringing friends and family together. With its vibrant colors, delightful flavors, and customizable nature, it’s an appealing centerpiece for any graduation gathering. I encourage you to try making one for your next celebration and share your unique experience and tips! Your guests will surely appreciate your thoughtful and delicious effort, making the milestone even more memorable.
Graduation Charcuterie Board
Ingredients
Method
- Begin by arranging the cheeses on a large platter or board, starting with the largest pieces to create a focal point.
- Fold or roll the cured meats and place them around the cheeses, ensuring some overlap for a more inviting look.
- Add the fresh fruits in clusters to create a vibrant splash of color. Fill in any gaps with nuts and olives, creating appealing sections.
- Place a variety of crackers and slices of bread in a separate section or along the edges of the board to offer guests various pairing options.
- Include small bowls with dips throughout the board, allowing for easy access and a tidy presentation.
- Finish off the arrangement by garnishing with fresh herbs, creating a beautiful contrast to the other ingredients.
- Serve the charcuterie board with pride and enjoy the compliments from your guests.