

I still remember the first time I bit into a crispy chimichanga, the flavors exploding in my mouth as I savored the combination of seasoned beef and melted cheese. It felt like a warm hug on a chilly evening, and I knew right then that I had discovered a meal cherished by my family. The Beef and Cheese Chimichangas became a go-to dish in our household, not just for their scrumptious goodness but also for the joy of making them together. There’s something incredibly satisfying about creating these delectable parcels of flavor from scratch, all while sharing laughs and stories around the kitchen.
What is Beef and Cheese Chimichangas
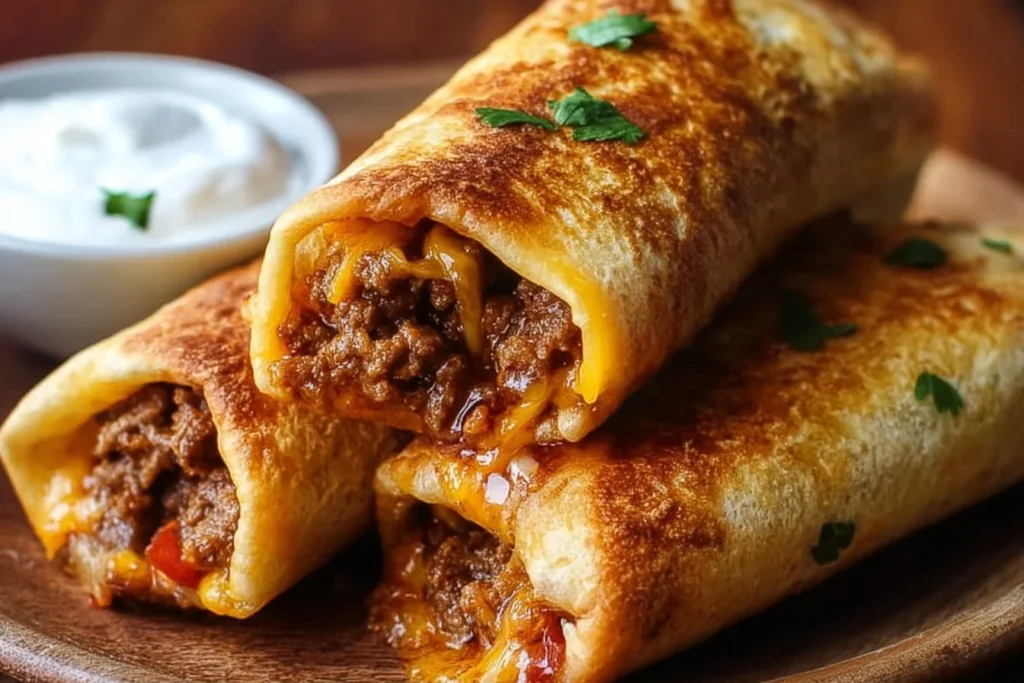
Beef and cheese chimichangas are a popular Mexican dish that features tortillas stuffed with a savory mixture of ground beef, cheese, and various seasonings. These filled tortillas are typically rolled up, then deep-fried or baked until golden brown and crispy. The result is a tantalizing meal that’s both satisfying and comforting. While you can find variations around the world, the classic combination of beef and cheese paired with spices and sometimes beans forms the heart of this dish, making it a favorite among many.
Why You’ll Love This Beef and Cheese Chimichangas:
There are plenty of reasons to love Beef and Cheese Chimichangas, making them not only a delicious treat but also a fantastic choice for family meals and gatherings. Here are key points that highlight the allure of this recipe:
Quick and simple to prepare: With easy-to-follow steps, this dish can be ready in no time, making it perfect for busy weeknights.
Family-friendly meal: Both kids and adults will appreciate the tasty filling and crispy exterior, making it a hit at the dining table.
Great for beginners: This recipe doesn’t require advanced cooking skills, just a willingness to roll some tortillas and fry them up!
Versatile ingredients: Customize your chimichangas with different fillings or toppings, adapting them to personal tastes or dietary preferences.
Make-ahead friendly: Prepare them in advance and pop them in the oven or skillet when you’re ready to serve, absolutely perfect for planned gatherings.
Beef and Cheese Chimichangas shine not just in flavor, but in their ability to bring people together, making special moments even more memorable.
Ingredients
• 1 lb ground beef
• 1 small onion (finely diced)
• 2 cloves garlic (minced)
• 1 packet (1 oz) taco seasoning (or homemade)
• ½ cup salsa
• 1 cup refried beans
• 1 ½ cups shredded cheddar cheese (or Mexican blend)
• 6 large flour tortillas (burrito-size)
• 2 tbsp vegetable oil (for brushing/frying)
Step-by-Step Instructions for Beef and Cheese Chimichangas
Start by cooking the beef filling. In a large skillet over medium heat, cook the ground beef and diced onion until the meat is browned and the onion is tender. Be sure to drain any excess grease to keep your chimichangas from becoming too oily. Next, stir in the minced garlic, taco seasoning, and salsa. Let this mixture simmer for 3 to 4 minutes to blend the flavors.
Now, it’s time to assemble the chimichangas. Take each tortilla and spread a spoonful of refried beans down the center. Top it with a generous scoop of the beef mixture followed by a handful of shredded cheese. Fold in the sides of the tortilla and roll it up tightly like a burrito, securing all the delicious filling inside.
When it comes to cooking the chimichangas, you have two methods to choose from. For a healthier option, preheat your oven to 400°F (200°C). Place the chimichangas seam-side down on a baking sheet, brush them lightly with vegetable oil, and bake for 18 to 20 minutes, flipping them once to achieve a crispy texture.
If you prefer a crispier version, heat 2 to 3 tablespoons of oil in a skillet over medium heat. Once hot, place the chimichangas seam-side down and cook for 2 to 3 minutes on each side until golden brown.
After cooking, allow them to rest for 2 minutes before serving. If desired, feel free to add toppings such as sour cream, guacamole, lettuce, or extra salsa for an enhanced experience.
Pro Tips and Variations:
To take your Beef and Cheese Chimichangas to the next level, consider these pro tips and variations:
Mix in veggies: Add diced bell peppers, corn, or black beans to the beef mixture for extra flavor and nutrition.
Use different cheeses: Experiment with cheeses like pepper jack or Monterey Jack for a unique twist and a little extra spice.
Spicy kick: If you enjoy some heat, add jalapeños or hot sauce to the filling.
Make them healthier: Opt for baked chimichangas instead of frying them to reduce calories and fat, or use whole wheat tortillas for a healthier option.
Freezing: Prepare a batch and freeze uncooked chimichangas. When you’re ready to eat, bake or fry them directly from the freezer, extending your meal options while saving on prep time.
These tips will help customize your chimichangas to suit every palate, ensuring they remain a beloved dish on any dining table.
How to Serve Beef and Cheese Chimichangas
Serving Beef and Cheese Chimichangas can be as creative as you wish. Here are some ideas to enhance your meal:
With sides: Pair the chimichangas with a fresh green salad topped with avocado slices and a light vinaigrette. Spanish rice or cilantro lime rice would also be a great companion on the side.
Toppings bar: Set up a toppings bar with options like sour cream, guacamole, diced tomatoes, chopped cilantro, lettuce, and salsa. Let everyone customize their chimichangas to make the meal interactive.
Soup pairing: For a comforting dinner, serve the chimichangas with a bowl of creamy tomato soup or tortilla soup, creating a satisfying combination.
These serving suggestions not only enhance the flavor experience but also add fun and variety to your dinner.
How to Store Beef and Cheese Chimichangas
Storing leftover Beef and Cheese Chimichangas is easy and can help preserve their deliciousness. To store, place any uneaten chimichangas in an airtight container in the refrigerator. They should stay fresh for up to 3-4 days.
If you want to extend their shelf life, freeze the chimichangas before or after cooking. Uncooked uncooked chimichangas can be stored in a freezer-safe container for up to 2 months. When you’re ready to enjoy, bake them directly from the freezer, adding a few minutes to the cooking time for best results.
To reheat leftovers, place chimichangas in the oven at 350°F (175°C) for about 15-20 minutes, or until heated through. This method helps retain the crispiness of the tortillas. Alternatively, you can use a microwave, but be aware this may result in a softer texture.
Nutrition Information
Nutrition information can vary based on the specific ingredients used and portion sizes. Here is a general breakdown for one serving of Beef and Cheese Chimichangas (based on typical ingredients):
Calories: 400-500
Protein: 25-30g
Carbohydrates: 30-35g
Fat: 20-25g
Fiber: 3-5g
Ensure to modify your recipe based on the ingredients you choose to achieve a more accurate nutritional profile.
FAQs Beef and Cheese Chimichangas
**Can I use ground turkey or chicken instead of beef?**
Absolutely! Ground turkey or chicken makes a great alternative for a leaner option while still providing excellent flavor.
Can I make chimichangas ahead of time?
Yes, you can prepare the filling and assemble the chimichangas ahead of time. Store them in the fridge for up to 24 hours before cooking, or freeze them for longer preservation.
Are the chimichangas gluten-free?
To make this dish gluten-free, simply use gluten-free tortillas and ensure that any seasoning or salsa used is also gluten-free.
Can I bake chimichangas instead of frying?
Yes! Baking is a great healthier alternative. Just brush them lightly with oil before baking to achieve a crispy texture.
Conclusion
Beef and Cheese Chimichangas are more than just a delicious meal; they embody warmth, family time, and joy in the kitchen. With their crispy exterior and savory filling, they are sure to become a favorite in your home. So why not give this cherished recipe a try? Your family will delight in the crispy goodness wrapped around the flavors they love. Make it a part of your next family dinner and share the experience. Let us know how it went; we would love to hear your chimichanga stories!
Beef and Cheese Chimichangas
Ingredients
Method
- In a large skillet over medium heat, cook the ground beef and diced onion until the meat is browned and the onion is tender. Drain any excess grease.
- Stir in the minced garlic, taco seasoning, and salsa. Let the mixture simmer for 3 to 4 minutes.
- Take each tortilla and spread a spoonful of refried beans down the center.
- Top with a scoop of the beef mixture, followed by a handful of shredded cheese.
- Fold in the sides of the tortilla and roll it up tightly.
- For baking, preheat the oven to 400°F (200°C). Place chimichangas seam-side down on a baking sheet, brush lightly with oil, and bake for 18 to 20 minutes, flipping once.
- For frying, heat 2 to 3 tablespoons of oil in a skillet. Cook chimichangas seam-side down for 2 to 3 minutes on each side until golden brown.
- Allow chimichangas to rest for 2 minutes before serving.