
Making homemade chocolate ice cream in blender feels almost like getting away with something. No bulky ice cream machine hogging your counter. No slow, fussy custard base. Just a few everyday ingredients, a blender you already own, and the kind of chocolate indulgence that makes you close your eyes for a second longer than necessary.
I’ll be honest I used to roll my eyes at chocolate ice cream. Too many disappointing pints tasted like someone whispered “chocolate” over a bowl of sugar. Then one summer afternoon, I decided to try my own, and suddenly the rules changed. Real cocoa, real cream, and zero shortcuts on flavor… except, well, the actual shortcut of using a blender instead of churning for hours.
The best part? This isn’t a weekend project. It’s the sort of thing you can throw together between dinner and your favorite show, knowing by tomorrow you’ll have something cold, rich, and unapologetically chocolate waiting in the freezer. And once you try it, you might quietly wonder why you didn’t start making it years ago.
Table of Contents
What is homemade chocolate ice cream in blender and why should you try it?
If we’re being literal, homemade chocolate ice cream in blender is exactly what it sounds like chocolate ice cream you make yourself, no churning, no machine, no drama. But that’s just the practical side of it. The real appeal? It’s the way it comes together in minutes, quietly convincing you that maybe, just maybe, the store-bought stuff was never as good as you thought.
You skip the complicated custards. You skip the fancy gadgets. Instead, you just bloom a little cocoa so it tastes deep and real, pour in cream and sweetened condensed milk, hit blend, and suddenly the kitchen smells like a dessert shop. Then it’s hands-off the freezer does the rest.
And here’s the thing most people don’t realize: you can bend the rules. Add espresso if you like a bittersweet edge, drizzle in some honey to keep it scoopable, or sneak in a splash of rum when no one’s looking. The point isn’t perfection it’s that you can have something cold, chocolatey, and utterly yours, without feeling like you spent half the day making it.
Ingredients for Homemade Chocolate Ice Cream in Blender
Here’s what you’ll need for homemade chocolate ice cream in blender:
- Heavy whipping cream (or double cream) Often the first ingredient in no-churn recipes. Solid, cold, and full-fat is your best friend for that ultra-creamy whip texture.
- Sweetened condensed milk The go-to sweetener and texture-saver. It brings both sweetness and scoopable body without needing sugar or eggs.
- Unsweetened cocoa powder Essential for that deep, chocolate punch. Many top recipes prefer Dutch-processed cocoa for richer color and flavor.
- Semi-sweet or dark chocolate (optional but often used) Found in more indulgent variants for deeper chocolate complexity.
- Pinch of salt & vanilla extract Tiny but transformative: salt amps the chocolate, and vanilla rounds the flavors.
- A texture softener A dash of honey, corn syrup, or a splash of alcohol (like vodka or rum) helps keep freezer-firm ice cream scoopable. This is especially useful in blender-only versions.
Step-by-Step Instructions
This isn’t one of those “melt everything together and hope for the best” situations. There’s a method here but it’s the easy kind.
- Bloom the cocoa
Pour your cocoa powder into a small saucepan with about ½ cup hot water. Stir it over low heat for a minute or two until it turns into a glossy paste. This wakes up the chocolate flavor and gets rid of those stubborn dry lumps. - Melt the chocolate (if using)
If you’re adding melted chocolate to boost the richness, do it now. A quick zap in the microwave (20-second bursts) or a double boiler works fine. Let it cool slightly so it doesn’t seize when it hits the cold cream. - Mix with condensed milk
Take the saucepan off the heat. Stir in the sweetened condensed milk until everything is smooth and uniform. This is where your base starts to come together. - Blend it all
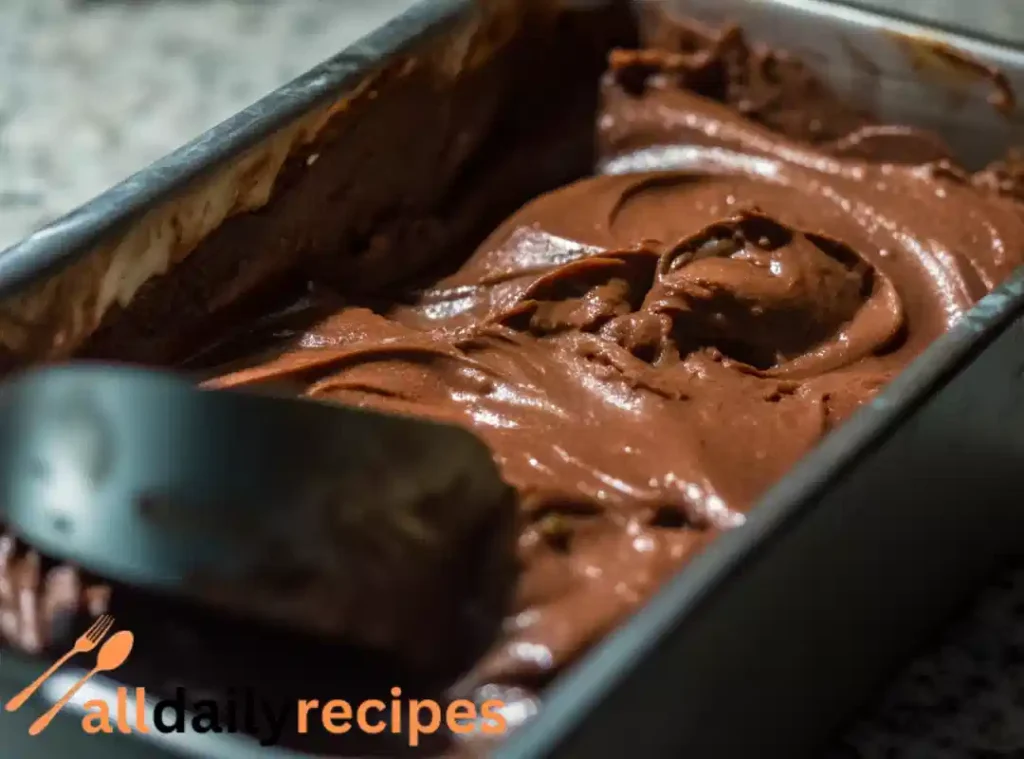
Pour the cocoa-condensed milk mixture into your blender. Add the cream, vanilla, pinch of salt, and whatever softener you’re using. Blend on medium for about 2–3 minutes, or just until the mixture thickens slightly and looks airy. - Freeze
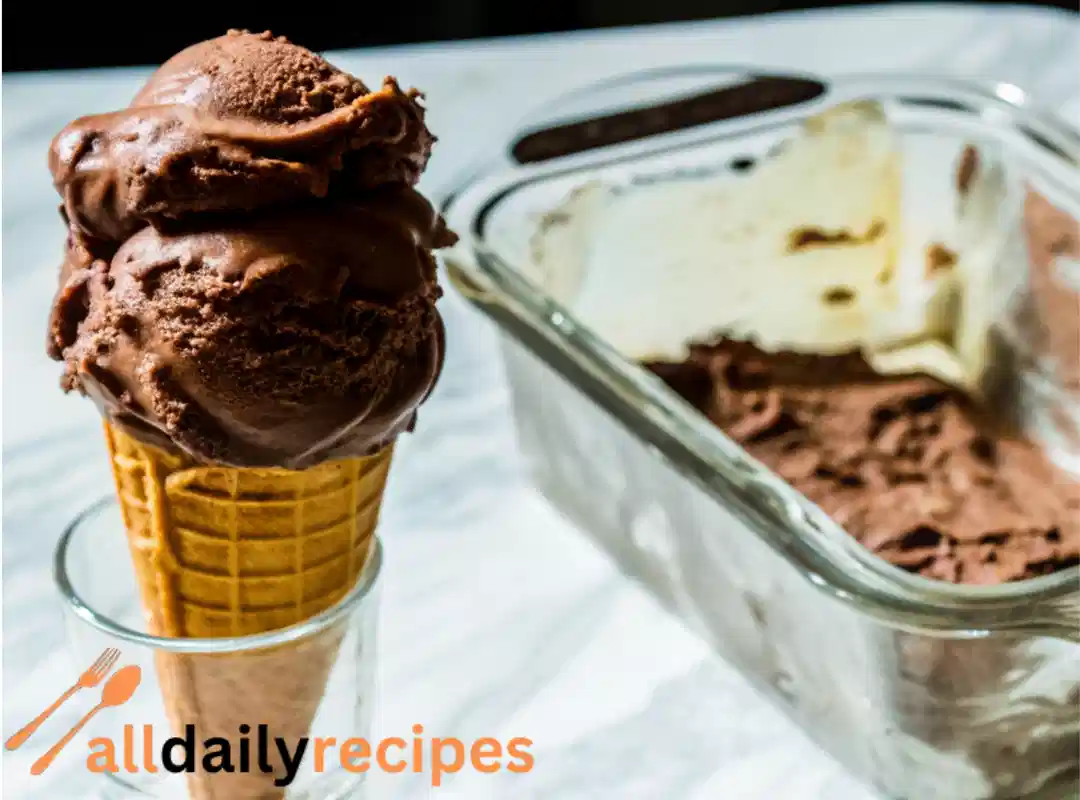
Scrape the mixture into a loaf pan (metal chills faster than glass), smooth the top, and cover it tightly with cling film. Pop it into the freezer for at least 6 hours overnight if you can wait. - Scoop & serve
Let the ice cream sit on the counter for 5–10 minutes before scooping, or dip your scoop into hot water for those perfect rounds.
Quick tip:
Don’t skip the blooming step. It’s the quiet hero here that little bit of heat coaxes out a richer, rounder chocolate flavor than just tossing dry cocoa into the blender.
Tips & Tricks for the Creamiest Blender Ice Cream
Good ice cream isn’t just about following the recipe it’s about knowing the little moves that make it exceptional. These are the things I’ve learned after a few rounds in the kitchen (and yes, a couple of freezer fails).
- Start with cold cream
Heavy cream whips better when it’s cold. If your kitchen’s warm, stick the cream and even your mixing jug in the fridge for 10 minutes before you start. - Bloom that cocoa, always
This step isn’t negotiable. Heating cocoa with a bit of water not only dissolves lumps, it brings out that dark, almost brownie-like flavor you can’t fake. - Sweetener flexibility
Condensed milk is the base sweetener here, but the “softener” part can be fun to play with. Honey gives a floral warmth, maple syrup a woodsy depth, and a splash of rum turns it into a grown-up treat. - Cover it well before freezing
Air is the enemy it causes icy patches. Press cling film right against the surface of the ice cream before covering the whole pan. - Scoop smart
Don’t fight with rock-hard ice cream. Let it sit out for a few minutes or run your scoop under hot water between servings.
How do I keep homemade no-churn ice cream from getting icy?
Keep your fat content high and your water content low. That means full-fat cream, proper softener, and covering it tightly in the freezer. Water loves to form ice crystals your job is to keep it trapped and blended into the fat and sugar.
Flavor Variations & Mix-Ins
Once you’ve nailed the basic homemade chocolate ice cream in blender, you can start having a little fun with it. Think of the base recipe as your blank canvas deep, rich chocolate that’s ready to carry just about any flavor you throw at it.
- Mocha swirl Add a teaspoon of instant espresso powder when blooming the cocoa. It sharpens the chocolate and gives that coffeehouse aroma.
- Boozy chocolate A splash of dark rum, brandy, or amaretto adds warmth and depth. Bonus: alcohol keeps the ice cream softer in the freezer.
- Chocolate chunk overload Fold in chopped dark, milk, or white chocolate after blending but before freezing. The chunks stay crisp and add texture.
- Nut lover’s version Stir in toasted pecans, almonds, or hazelnuts for a salty crunch.
- Caramel ribbon Drizzle caramel sauce in layers as you pour the blended mixture into the pan. Use a butter knife to gently swirl it through without overmixing.
- Mint chocolate dream A drop or two of peppermint extract turns the whole thing into a refreshing summer scoop.
Quick tip:
If you’re adding solid mix-ins, keep them small too big and they’ll sink or turn into hard, tooth-breaking chunks once frozen. Aim for pieces no bigger than a chocolate chip.
Troubleshooting Homemade Chocolate Ice Cream in Blender
Even with a foolproof recipe, little things can trip you up. Here’s how to spot them and fix them before your ice cream turns into a brick or a bland disappointment.
Problem: It’s rock-hard and impossible to scoop
Likely cause? You skipped the softener or used too little. Honey, maple syrup, or even a splash of alcohol changes the freezing point just enough to keep things scoopable. Also, let the pan sit out for 5–10 minutes before you try to dig in.
Problem: The texture is icy
That usually means too much water in the mix or air exposure in the freezer. Stick with full-fat cream (no “light” versions), bloom your cocoa properly, and cover the surface directly with cling film before sealing the container.
Problem: The chocolate flavor is weak
Cheap cocoa can be flat, and not blooming it means you’re missing half the flavor. Use the best cocoa you can find, and don’t skip the heating step. If you want an extra punch, add a bit of melted dark chocolate into the base.
Problem: It tastes… off
Double-check your cream dairy that’s even slightly past its prime can throw off the whole batch. Also, store your ice cream in an airtight container so it doesn’t pick up freezer odors.
Can I fix icy ice cream after it’s frozen?
You can try blending it again (let it soften slightly first) and refreezing, but it’s never quite the same. Prevention is your best friend here.
Nutrition Information
This is a dessert, so let’s be real it’s not meant to be “light.” But if you’re curious about what’s in each scoop of homemade chocolate ice cream in blender, here’s a rough estimate based on standard ingredients and a 10-serving batch:
Per serving (about ½ cup):
- Calories: ~290
- Fat: 19g
- Saturated Fat: 12g
- Carbohydrates: 28g
- Sugar: 26g
- Protein: 4g
- Sodium: 60mg
Note:
These numbers will shift depending on the brand of cocoa, type of cream, and whether you add mix-ins like chocolate chunks or caramel. If you swap for dairy-free options, expect the fat and calorie count to change, but the sugar content will usually be about the same.
Serving Suggestions
One of the best parts about homemade chocolate ice cream in blender is dressing it up however you like. Sure, you can eat it straight from the pan (no judgment here), but a few thoughtful touches can turn a casual scoop into something memorable.
- Classic cone A crisp waffle cone and a generous scoop, maybe with a sprinkle of sea salt flakes over the top.
- Brownie à la mode Warm brownie underneath, melting ice cream on top. Enough said.
- Affogato twist Pour a shot of hot espresso over a small scoop for a bittersweet, coffee chocolate combo.
- Nut crunch topping Toasted hazelnuts, pecans, or almonds for a savory counterpoint to all that creaminess.
- Caramel drizzle A ribbon of salted caramel sauce over each serving takes it into “fancy dessert” territory.
- Berry pairing Fresh raspberries or strawberries for a little tartness to balance the richness.
Quick tip:
If you’re serving guests, freeze the scoops individually on a tray for an hour before plating. That way, you can assemble desserts quickly without wrestling a rock-hard tub at the table.
Frequently Asked Questions
Can I make homemade chocolate ice cream in blender dairy-free?
Yes but you’ll need the right swaps. Use a full-fat coconut cream in place of dairy cream, and look for sweetened condensed coconut milk. The texture will still be creamy, though the flavor will have a coconut undertone (which honestly pairs beautifully with chocolate).
Can I skip the honey or other softener?
Technically yes, but you’ll regret it the first time you try to scoop it straight from the freezer. Without a softener, no-churn ice cream tends to freeze rock-solid.
How long will it last in the freezer?
If stored well meaning covered tightly so no air gets in it’s good for about a month. Past that, the texture starts to break down and the flavor can pick up freezer odors.
Can I use a hand mixer instead of a blender?
You can. Whip the cream separately until soft peaks form, then fold it into the cocoa-condensed milk mixture. It’s a little more hands-on, but it works.
Does blooming cocoa really make a difference?
Absolutely. Without it, the chocolate flavor is muted. Heating cocoa with water opens up its flavor compounds and makes everything taste richer.
Conclusion
At the end of the day, homemade chocolate ice cream in blender is one of those recipes that quietly changes the way you think about dessert. It’s proof that you don’t need an ice cream maker, a pastry chef’s skill set, or an entire Saturday to make something rich, creamy, and worth savoring.
You get to control the flavor, tweak the texture, and make it exactly the way you like whether that’s spiked with rum, swirled with caramel, or left pure and unapologetically chocolate. And there’s a kind of satisfaction that comes from scooping out something you made yourself, knowing it took minutes of effort for hours of enjoyment.
So maybe this is your weekend project. Or maybe it’s just what you throw together on a Tuesday night when the craving hits. Either way, once you’ve had a spoonful, you’ll understand why it’s the recipe I keep coming back to and why you might, too.
Homemade Chocolate Ice Cream
Ingredients
Method
- Bloom the cocoa: Pour cocoa powder into a saucepan with half a cup of hot water, stirring over low heat until it becomes a glossy paste.
- Melt chocolate (if using): Melt the chocolate in the microwave or double boiler, then let it cool slightly.
- Mix with condensed milk: Remove the saucepan from heat and stir in sweetened condensed milk until smooth.
- Blend it all: Pour the cocoa-condensed milk mixture into a blender, add cream, vanilla, salt, and softener. Blend for 2-3 minutes until thickened.
- Freeze: Transfer the mixture to a loaf pan, cover tightly with cling film and freeze for at least 6 hours or overnight.
- Scoop & serve: Allow the ice cream to sit at room temperature for 5-10 minutes before scooping, or dip your scoop in hot water for easier serving.