
Baking a birthday cake from scratch isn’t just about skipping the box mix. It’s about showing up. It’s about remembering how your mom used to let you lick the beaters or how your grandmother never measured vanilla. It’s about doing something a little slower, a little more meaningful, for someone who matters. Even if that someone is you.
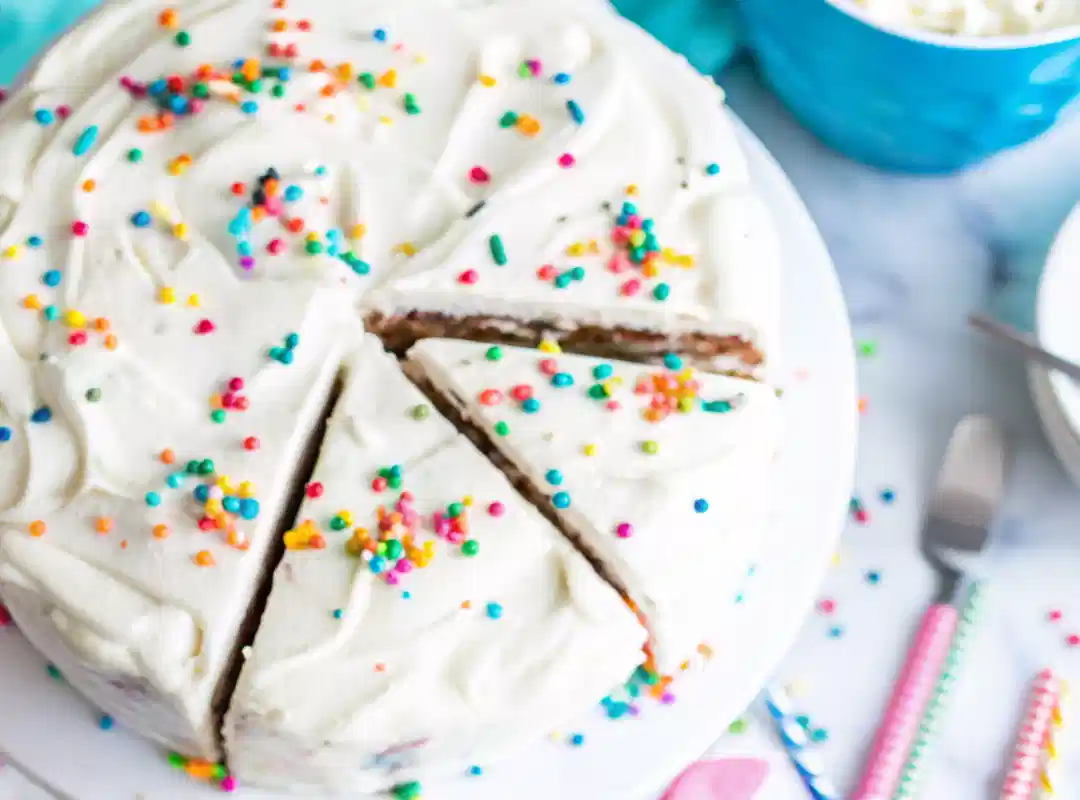
This isn’t a fancy bakery-style cake. It’s better. It’s that buttery-soft, golden-yellow, honest kind of cake that people quietly take seconds of. The kind that doesn’t need a glossy finish or perfect piping to feel like a celebration. The flavor holds up on its own. So does the memory it creates.
In this guide, I’ll walk you through how to make it from start to finish. No jargon. No fuss. Just what works. The ingredients are simple, the steps are clear, and the results? They speak for themselves. Moist layers. Creamy frosting. And the quiet joy of knowing you made it all by hand.
Table of Contents
Ingredients You’ll Need for the Perfect Birthday Cake
No tricks here. Just the kind of ingredients that live in your pantry even when you haven’t baked in months. That’s the beauty of this recipe. It feels familiar because it is. These are the basics that come together and somehow become something memorable.
For the Cake:
- Granulated Sugar Not too sweet, just right. It’s the backbone of every good crumb.
- Unsalted Butter Softened, not melted. It gives the cake that rich, golden feel.
- Eggs Four of them. They bring the structure and the lift.
- Vanilla Extract Go for the real stuff if you can. It’s the invisible magic.
- All-Purpose Flour No fancy blends. Just measure it with care and you’re good.
- Baking Powder Your rise. Without it, you’re making pancakes.
- Salt Yes, even dessert needs salt. Just a pinch to keep things balanced.
- Whole Milk Room temp helps everything mix without a fight.
- Sprinkles (optional) If the occasion calls for color, toss them in gently.
For the Frosting:
- Soft Butter Makes your mixer purr. No cold blocks, please.
- Powdered Sugar Sift it if you’re patient. Don’t, if you’re not. It still works.
- Milk Add it slowly. Too much and you’ll chase thickness for ten minutes.
- Vanilla or Butter Flavoring Depends on your vibe. Classic or bakery-style twist.
You don’t need a backup plan or a second run to the store. If your kitchen’s stocked with the basics, this cake’s already halfway made. And if not, the nearest grocery trip is the only thing standing between you and the kind of cake people ask about later.
Is it okay to skip the sprinkles?
Absolutely. They’re fun, not mandatory. Without them, you’ve still got a solid vanilla cake that holds its own.
Step-by-Step Instructions (With Timing & Tips)
This is where it gets real. One bowl gets fluffy, another gets dusty, and suddenly you’re halfway to cake. You don’t need to be precise to the millimeter here. Just pay attention and don’t rush. Baking isn’t hard but it does notice when you’re distracted.
Step 1: Cream Butter and Sugar
Start with softened butter. Not melted. Not cold. Just that perfect in-between. Toss it in a big bowl with the sugar and beat until it looks pale and airy. This isn’t just for looks this step makes the whole cake lighter. Give it a good 2 or 3 minutes on medium speed.
Step 2: Add Eggs and Vanilla
Crack in the eggs one by one. No shortcuts here. Mix after each or the batter gets weird and sloshy. Add the vanilla once they’re all in. It might look a bit separated keep going.
Step 3: Mix Dry Stuff Separately
In a second bowl, stir together the flour, baking powder, and salt. Nothing fancy. A fork or spoon works. Just get everything evenly mixed.
Step 4: Bring It Together
Now alternate between the dry mix and milk. Start with flour. End with flour. Pour a little in, mix. Pour a little milk, mix. Repeat until it’s all in. Don’t overdo the stirring or you’ll lose the fluff. Stop as soon as it looks smooth-ish.
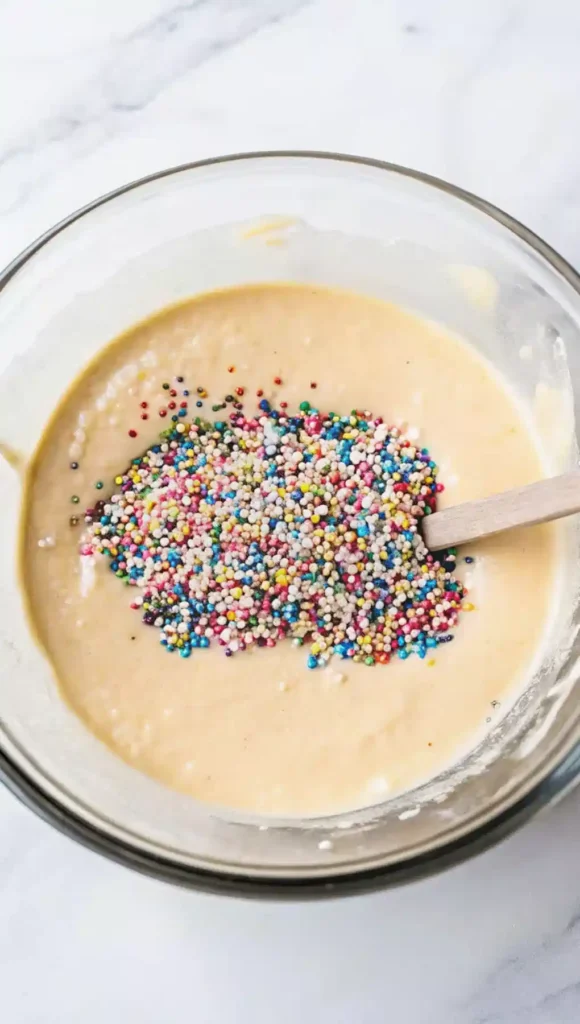
Step 5: Add Sprinkles (If You’re Feeling It)
If sprinkles are your thing, fold them in now. Not stir. Fold. Think gentle. Color bleeds fast and turns the batter gray if you get overexcited with the spoon.
Step 6: Prep Your Pans
Grease those pans like you mean it. Butter and flour, spray, parchment — whatever you trust. Divide the batter as evenly as you can. If one pan gets more, that’ll be the bottom layer. It’s fine.
Step 7: Bake
350°F. Middle rack. About 30 to 35 minutes. Start checking at 28. When the top is lightly golden and a toothpick comes out mostly clean, you’re good. Don’t wait for bone-dry. Cakes finish setting while they cool.
Step 8: Cool Down
Let the pans sit for 10 minutes, then turn the cakes out onto a wire rack. Walk away. Resist the urge to frost early. A warm cake turns buttercream into soup.
My layers aren’t the same height now what?
Stack the taller one on the bottom. Or slice it to even things out. Or just roll with it. Imperfect cakes taste exactly the same.
Related topics:
Making the Perfect Buttercream Frosting
There’s a fine line between “Wow, you made this from scratch?” and “Did the frosting split?” Buttercream is simple in theory, but the details matter. Not fancy tools or secret ingredients just patience, texture, and knowing when to stop mixing.
Step 1: Butter, Room Temp. No Negotiation.
Cold butter? Don’t even start. You’ll just end up chasing lumps. Soft butter is key. Drop it in a bowl with about a quarter of your powdered sugar. Turn on the mixer. It’ll look like a mess at first that’s expected. Keep going.
Step 2: Dump, Stir, Adjust
Add the rest of the sugar in one go. Add half the milk and the vanilla (or butter flavoring, if you’re chasing that bakery-style taste). Start mixing low, then crank it up. If it’s too stiff, trickle in more milk. If it’s runny, throw in a spoonful more sugar. Trust your eyes. Trust your spoon. The texture should hold a soft peak think fluffy, not stiff.
Step 3: Taste It Like You Mean It
Don’t skip this. Take a swipe. Does it need more vanilla? A pinch of salt to balance it? Tasting as you go is the only way to land that just-right flavor. Recipes don’t have taste buds.
Step 4: Fluff It Till It Sings
Once you’ve got the texture close, give it another minute or two on medium-high. Not just to mix but to aerate. This is where the magic happens. The frosting lightens, smooths out, and starts to look like it belongs in a bakery window. Now it’s ready. Not too sweet. Not too dense. And absolutely spreadable.
What if my frosting gets too soft?
Pop the bowl in the fridge for ten minutes, then whip again. Usually, that’s enough to bring it back.
Decorating Tips to Make It Pop
This is the part where things either get wildly fun or unnecessarily stressful. Don’t let perfection get in the way of personality. This cake isn’t auditioning for a magazine spread it’s for a birthday. That means messy swirls, colorful sprinkles, and maybe a lopsided candle or two. And that’s exactly what makes it special.
Tip 1: Frost From the Top Down
Start with a big scoop of frosting right on top of the first cake layer. Don’t touch the cake directly with your knife just push the frosting around gently. Let it glide. Once you have an even layer, place the second cake on top, bottom side up. That gives you a flat surface for the final coat.
Tip 2: Swirl, Don’t Smooth
Add another scoop of frosting to the top and start pulling it out toward the edges, then down the sides. Forget razor-sharp edges. A few visible strokes and swirls make it feel handmade in a good way. It’s cake, not drywall.
Tip 3: Add Sprinkles While the Frosting Is Soft
As soon as you’re done spreading, sprinkle like you mean it. Once the frosting sets, the sprinkles won’t stick. If you’re using nonpareils, go light they bleed fast.
Tip 4: Embrace Imperfections
Your cake doesn’t need to be symmetrical or frosted like a bakery model. Those swipes, smudges, and crooked candles? That’s personality. That’s memory. Own it.
What if I want to pipe decorations?
You can but you don’t have to. Use a zip-top bag with the corner snipped off if you don’t own piping tips. Fill it, squeeze gently, and draw swirls or dots. Or skip it and let the sprinkles do the talking.
Flavor Swaps and Frosting Alternatives
Let’s be honest once you’ve nailed the base cake, it’s hard not to start wondering what else it can do. You’ve got options, and none of them require fancy tricks or obscure ingredients. Just a few small shifts and this “vanilla” birthday cake becomes whatever you’re craving.
Flavor Variations You Can Pull Off Without Overthinking:
- Almond Extract Just a splash. Too much and it tastes like lotion. Half vanilla, half almond? That’s the sweet spot.
- Lemon Zest + a Few Drops of Extract Suddenly it’s bright, tangy, and feels like a spring picnic. Works great with berry toppings too.
- Coconut Milk Instead of Dairy It doesn’t shout coconut, but there’s a soft richness in the background. Add flakes if you want to drive it home.
- Cocoa Powder Swap Want chocolate? Sub about ½ cup of the flour with unsweetened cocoa powder. Don’t overdo it or you’ll lose the fluff.
Frosting Alternatives That Still Feel Like a Celebration:
- Cream Cheese Frosting Cuts the sweetness with a little tang. Especially good with lemon or spice cakes.
- Chocolate Ganache Rich, glossy, and dead simple. Heat cream, pour over chocolate, stir, pour. It sets like magic.
- Whipped Cream + Mascarpone Light and a little fancy. Great if you’re not a fan of sugary frostings, but skip it if it’s hot out it won’t hold.
There’s no wrong path here. This recipe gives you a solid foundation and the freedom to tweak without wrecking the whole thing. Try something new next time. Worst case? You still end up with cake.
Can I mix flavor ideas together?
Yes and you should. Lemon cake with almond frosting? Coconut cake with chocolate glaze? Go for it. This isn’t a test. It’s dessert.
Easy Birthday Cake FAQs
Can I use non-dairy milk?
What if I don’t have a stand mixer?
Can I make this as cupcakes?
How do I keep my layers even?
Can I color the frosting?
What if I only have one cake pan?
Conclusion
So now you’ve got the recipe. But more than that, you’ve got a reason to slow down, stir something by hand, and maybe get a little frosting on your sleeve. This cake isn’t complicated and that’s what makes it work. It’s forgiving, flexible, and full of those little moments that matter more than any store-bought shortcut ever could. Bake it for someone you love. Or for yourself. Either way, it’s going to taste like effort, care, and something worth celebrating.
Birthday Cake
Ingredients
Method
- Cream the softened butter and sugar together in a large bowl until pale and airy, about 2-3 minutes on medium speed.
- Add the eggs one by one, mixing after each. Then, add the vanilla extract.
- In another bowl, mix together the flour, baking powder, and salt.
- Gradually combine the dry ingredients with the milk, alternating between them, starting and ending with the flour.
- If desired, gently fold in the sprinkles.
- Prepare your cake pans by greasing them well.
- Preheat the oven to 350°F (175°C) and bake for about 30-35 minutes or until a toothpick comes out clean.
- Allow cakes to cool in their pans for 10 minutes before transferring to a wire rack to cool completely.
- Start the buttercream frosting by creaming soft butter with a portion of the powdered sugar until combined.
- Gradually add the remaining powdered sugar along with half the milk and flavoring. Adjust consistency with more milk or sugar as needed.
- Once the cakes are completely cool, frost the top and sides with the prepared buttercream frosting, adding sprinkles if desired.
Thank you for another informative blog. Where else could I get that kind of info written in such a perfect way? I have a project that I’m just now working on, and I’ve been on the look out for such info.