
There’s something disarmingly nostalgic about biting into a soft, chewy cookie with a thick slab of creamy ice cream sandwiched in the middle. You don’t think about ingredients or prep time you think about sticky fingers on hot days, backyard laughter, and maybe even that corner store freezer that made a specific clunk every time it opened.
But here’s the thing: homemade ice cream sandwiches aren’t just a throwback they’re an upgrade. And not the kind of upgrade that demands a culinary degree or fancy gadgets. This one’s all about intention: choosing your cookie texture, dialing in your favorite ice cream flavor, and freezing memories along with dessert.
If you’ve never made them before, good. That means you’re in for a genuinely satisfying first. And if you have made them? I’m betting this version might still surprise you because we’re skipping the churn, layering just the right cookie-to-cream ratio, and building in small moments that’ll make you go, “Wait… why have I not been doing it this way?”
In this guide, you’ll learn how to make classic homemade ice cream sandwiches no machine, no fuss, just freezer magic. Let’s get into the why first.
Table of Contents
Why Make Homemade Ice Cream Sandwiches?
Because store-bought ones let’s be honest are often a bit of a letdown. Too icy, too processed, or weirdly chewy in a way that doesn’t quite hit. You unwrap them, expecting magic, and get something that feels like it was made a month ago… because it probably was.
Homemade, though? That’s where the real charm lives. You control everything the richness of the ice cream, the softness (or snap) of the cookie, even the thickness of the filling. Want peanut butter cookies with strawberry swirl ice cream? Go for it. Prefer a thinner cookie with a salted caramel layer? Done. You’re no longer at the mercy of what’s in the freezer aisle.
And then there’s the satisfaction the kind that comes from building something with your hands. Watching the cream thicken, cutting perfect rectangles of dough, assembling each sandwich like it matters (because it does). It turns dessert into a moment, not just a treat.
Here’s another thing people don’t talk about enough: making these with kids, partners, or even just for yourself adds a layer of joy you can’t package. It’s nostalgic, tactile, and somehow feels like self-care.
Plus, if you’re the type who checks ingredients or cares about what’s really in your food homemade wins, every time.
So yes, it takes a little extra time. But that’s the tradeoff for something better than nostalgia: control, freshness, creativity… and ice cream that doesn’t crack your molars.
Ingredients for Homemade Ice Cream Sandwiches
No complex ingredients. No weird additives. Just pantry staples that come together in a way that makes you wonder why we ever settled for the boxed kind.
For the Chocolate Cookies:
- 1¼ cups (156 g) all-purpose flour sifted for best texture
- ⅓ cup (39 g) unsweetened cocoa powder regular, not Dutch-processed (unless you prefer a deeper flavor)
- ½ teaspoon baking powder
- ½ teaspoon kosher salt
- ½ cup (1 stick / 113 g) unsalted butter softened to room temp
- ½ cup (100 g) light brown sugar, packed
- ¼ cup (50 g) granulated sugar
- 1 large egg also room temp for proper mixing
- 1 teaspoon vanilla extract
Tip: Room-temperature butter and egg make for smoother dough that bakes evenly. It’s a small detail, but it matters.
For the No-Churn Vanilla Ice Cream:
- 2 cups (476 g) heavy whipping cream
- 1 can (14 ounces) sweetened condensed milk
- 1 teaspoon vanilla extract
- ⅛ teaspoon kosher salt
BTW: This ice cream doesn’t require an ice cream maker just a bowl and a mixer. Once you try it, you’ll probably start using it for other desserts too.
How to Make Homemade Ice Cream Sandwiches: Step-by-Step
Yes, this recipe takes a bit of freezer patience. But the hands-on steps? Surprisingly simple and kind of therapeutic, honestly. Here’s how to bring it all together:
1. Make the No-Churn Ice Cream (First, so it can set)
- Line a 9×13-inch pan with parchment paper, including up the sides. Set aside.
- In a mixing bowl, whip the heavy cream starting on low, increasing to medium-high until stiff peaks form. (Takes about 3–4 minutes watch closely.)
- In a separate bowl, combine the sweetened ondensed milk, vanilla, and salt with about a cup of the whipped cream. Stir gently.
- Fold that mixture back into the whipped cream. Don’t overmix just until it’s smooth and uniform.
- Pour into the pan and freeze for at least 3 hours, or until firm enough to slice.
Why first? The ice cream needs time to set so you’ll make it before prepping the cookies.
2. Make the Cookie Dough
- In one bowl, whisk together flour, cocoa powder, baking powder, and salt.
- In another, beat the butter, brown sugar, and white sugar until creamy.
- Add in the egg and vanilla to the butter mixture. Beat again until smooth.
- Slowly add the dry mix to the wet, mixing just until a dough forms. Don’t overmix.
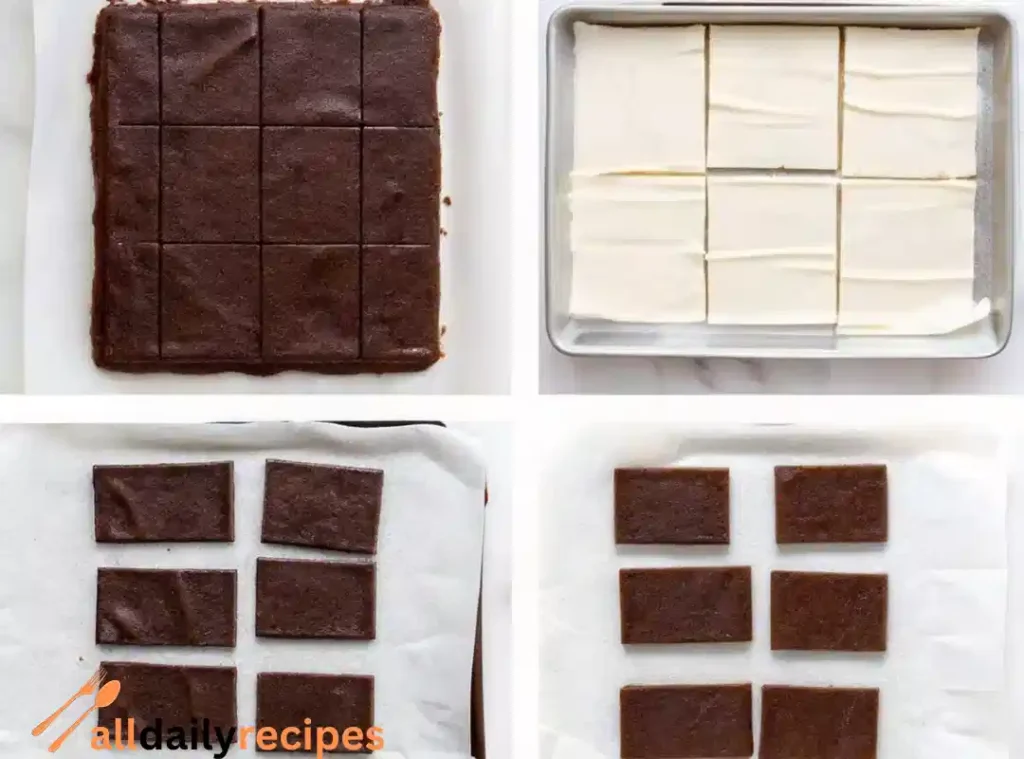
- Roll the dough out between parchment to a 12×15-inch rectangle, about ⅛-inch thick. Chill in the fridge for 25–30 minutes.
3. Cut, Bake & Cool
- Preheat oven to 350°F (175°C).
- Once chilled, cut dough into 4×2-inch rectangles (a paper template helps).
- Use a toothpick to poke small holes in each cookie classic ice cream sandwich style.
- Re-roll scraps, chill, and cut again as needed. Aim for 24 cookies total.
- Bake for 8–10 minutes edges should be firm, centers slightly soft.
- Cool completely before assembling.
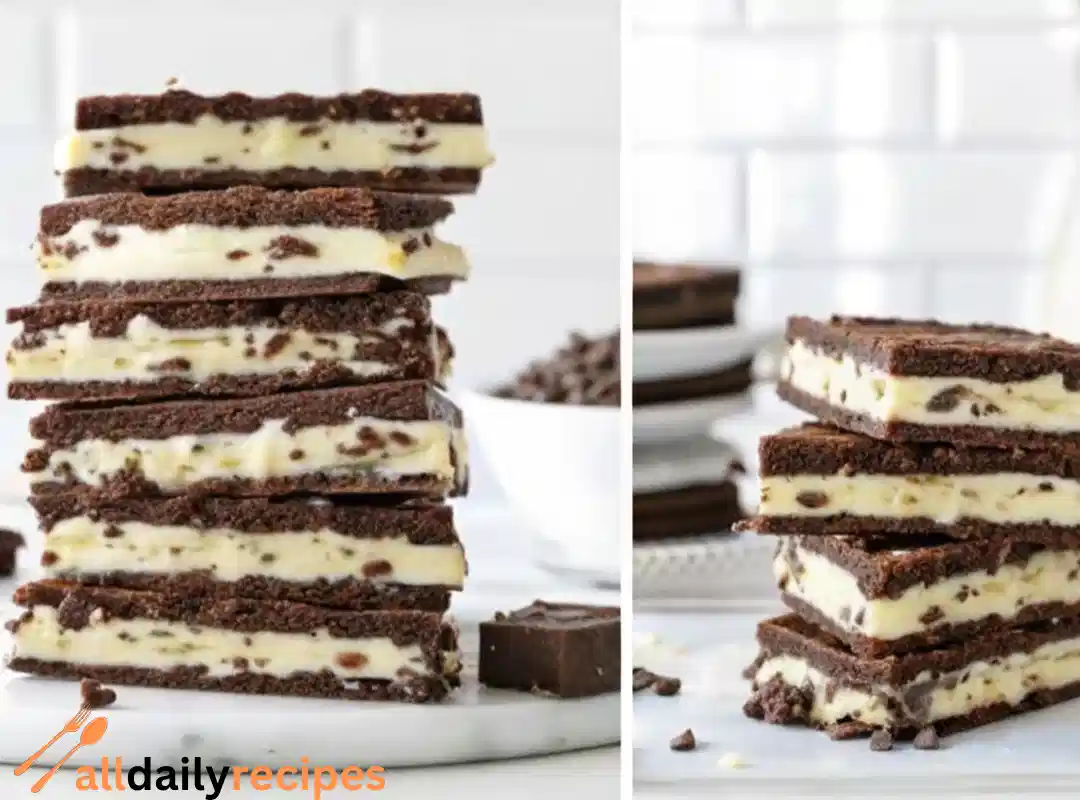
4. Assemble the Sandwiches
- Remove the ice cream from the pan and cut into twelve 4×2-inch blocks.
- Pair up cookies, placing a slice of ice cream between each pair. Press gently.
- Place on a parchment-lined tray, cover loosely with plastic wrap, and freeze at least 8 hours (overnight is even better).
How long do homemade ice cream sandwiches last?
Properly wrapped and frozen in an airtight container, they’ll keep for about a month though they rarely last that long in real life.

Tips & Tricks for Perfect Ice Cream Sandwiches
You can just follow the recipe and be fine but if you’re the kind of person who likes insider moves, this section’s for you. These little tweaks and fixes make a big difference in how your sandwiches look, feel, and taste.
Chill is Everything
- Dough too soft? Chill longer. Seriously. If the dough’s even slightly sticky, it’ll stretch or warp when you try to cut it. Cold dough = clean edges.
- Ice cream too firm to cut? Let it sit at room temp for 5 minutes before slicing not longer. You want it soft enough to slice, not melt.
Use a Paper Template
- Grab an index card or scrap paper, cut it to 4×2 inches, and trace around it with a butter knife or bench scraper. It’s faster and way more consistent than eyeballing it.
No Stand Mixer? No Problem.
- You can totally whip the cream with a hand mixer or by hand with a whisk if you’re feeling ambitious (and have time/forearms of steel).
Clean Cuts, Every Time
- Use a warm knife to slice the ice cream: run it under hot water and wipe between each cut.
- Don’t saw back and forth press down in one confident motion.
Assemble Like a Pro
- Match cookie pairs by size before starting saves time mid-assembly.
- If your ice cream slabs are a little uneven, just trim the sides. (Bonus: snackable scraps.)
Can I prep these in advance for a party?
Absolutely in fact, you should. Make them a few days ahead, freeze well-wrapped, and pull out 5–10 minutes before serving for the best bite texture. They’ll impress your guests like they were made that morning.
Variations & Substitutes for Ice Cream Sandwiches
Once you’ve nailed the base recipe, it’s impossible not to start wondering: what if I swapped this flavor, or tried that cookie instead? Good news these sandwiches are wildly adaptable. Whether you’re tweaking for allergies, flavor preference, or a seasonal twist, here’s how to remix the magic.
Ice Cream Flavor Twists
- Chocolate lovers: Add ¼ cup cocoa powder to the ice cream mix or swirl in fudge before freezing.
- Berry vibe: Gently fold in mashed raspberries or a spoonful of jam it’ll ripple through beautifully.
- Coffee hit: Replace half the vanilla with strong espresso or coffee extract for a subtle mocha base.
- Nutty addition: Stir in crushed peanuts, pistachios, or almond slivers for texture.
Pro tip: Soft add-ins like fruit swirls or cookie crumbles work best avoid hard chunks that’ll freeze solid.
Cookie Swaps
- Peanut butter base: Replace cocoa with 2–3 tablespoons of peanut butter for a creamy, rich cookie twist.
- Oatmeal edges: Use a thin oatmeal cookie dough for an earthy, nostalgic vibe.
- Gluten-free version: Use a 1:1 gluten-free flour blend chill the dough a bit longer for better shape.
- Graham sandwich: Go minimalist with graham crackers and frozen yogurt for a s’mores-inspired shortcut.
Dietary or Allergy-Friendly Tweaks
- Vegan version: Use plant-based whipping cream and a vegan condensed milk (like coconut). Pair with dairy-free cookie dough.
- Lower sugar: Halve the sugars in the cookie it’ll be slightly less chewy but still sandwich-worthy.
- Nut-free tip: Avoid extracts like almond or nut-based add-ins. Stick to classic vanilla and chocolate blends.
Can I make these in fun shapes?
Yes! Use heart, star, or animal-shaped cookie cutters for birthdays, holidays, or themed parties. Just keep the thickness even so they freeze properly and stay stackable.
Nutrition Breakdown (Per Sandwich)
Let’s be honest you’re probably not eating these for the macros. But if you’re curious or tracking intake, here’s the estimated breakdown for one full ice cream sandwich (cookie + ice cream):
- Calories: ~380–420
- Total Fat: 21g
- Saturated Fat: 13g
- Carbohydrates: 45g
- Sugar: 31g
- Protein: 4g
- Fiber: 2g (if using cocoa with natural fiber)
- Sodium: ~180mg
Note: Using store-bought ice cream, swapping sugars, or changing cookie types will shift these values slightly. These are based on standard full-fat ingredients.
Frequently Asked Questions About Homemade Ice Cream Sandwiches
You’ve got the recipe, you’ve seen the variations but let’s clear up the little questions that might still be bouncing around in your head.
Can I use store-bought ice cream?
How far in advance can I make them?
My cookies turned out too crisp. Fix?
Can I use different shapes for the cookies?
What if I don’t have a 9×13 pan?
Conclusion
Homemade ice cream sandwiches aren’t just a dessert they’re a tiny act of joy-making. They’re what happens when you slow down long enough to whip cream from scratch, cut cookies with intention, and build something that feels… well, personal.
Maybe you’re making them for your kids, your partner, a backyard get-together or maybe it’s just you, reclaiming a piece of summer. Either way, you’ll end up with something that beats anything you could buy in a box.
So print it out, save it for the next hot Saturday, or better yet make a batch now and stash them in the freezer for when you really need a treat that tastes like effort and memory in equal parts.

Homemade Ice Cream Sandwiches
Ingredients
Method
- Line a 9×13-inch pan with parchment paper, including up the sides. Set aside.
- In a mixing bowl, whip the heavy cream starting on low, increasing to medium-high until stiff peaks form (about 3–4 minutes).
- In a separate bowl, combine the sweetened condensed milk, vanilla, and salt with about a cup of the whipped cream. Stir gently.
- Fold that mixture back into the whipped cream until smooth and uniform.
- Pour into the prepared pan and freeze for at least 3 hours, or until firm.
- In one bowl, whisk together flour, cocoa powder, baking powder, and salt.
- In another bowl, beat the butter, brown sugar, and white sugar until creamy.
- Add in the egg and vanilla to the butter mixture. Beat again until smooth.
- Slowly add the dry mix to the wet, mixing just until a dough forms.
- Roll the dough out between parchment to a 12×15-inch rectangle, about ⅛-inch thick. Chill in the fridge for 25–30 minutes.
- Preheat oven to 350°F (175°C).
- Once chilled, cut dough into 4×2-inch rectangles and poke small holes in each cookie.
- Bake for 8–10 minutes until edges are firm and centers are slightly soft.
- Cool completely before assembling.
- Remove the ice cream from the pan and cut into twelve 4×2-inch blocks.
- Pair up cookies, placing a slice of ice cream between each pair. Press gently.
- Place on a parchment-lined tray, cover loosely with plastic wrap, and freeze at least 8 hours or overnight.